Monday, November 20, 2017
Saturday, July 22, 2017
Backup your AS400 SAVF in your PC
Hello Friends,
Taking backup is one of the most important thing in project life cycle. When
it comes to AS400 we do save our program & data objects into TAPE using
SAVOBJBRM commands. But we can also take a copy of our works (program &
data objects) and save it in SAVF. And this SAVF can be transferred into your
desktop.
This could be useful if you want to transfer any objects from one AS400
to another AS400 but both are not talking to each other. (If both servers are
in same network then we can just copy the data using any ways like DDMF or
SNDNETF or FTP)
Downloading your SAVF into your PC:
Step 1: Save your objects into SAVF
We are creating a SAVF called BKUP and saving object TESTDATA inside the SAVF

Now before we look on how to transfer this to your desktop, we need understand
the IFS representation of an object in AS400.
Now our SAVF object DEVYUS1/BKUP can be viewed/identified as IFS path
using below command
WRKLNK ‘/QSYS.LIB/DEVYUS1.LIB/BKUP.FILE’

In similar fashion we can see all our PF, Programs and other objects. This
is important because using this we are going to FTP our BKUP.FILE into our
desktop.
Step 2: Download BKUP SAVF into our desktop

When we login the current IFS directory is our home directory
(/Home/DEVYUS) then we change that using Change Directory (CD) command as
/QSYS.LIB/DEVYUS1.LIB
Then we change our desktop local directory (whatever you wish)
Then we choose BIN (Binary) mode to receive the file (SAVF can be
transferred using BIN mode)
Then just GET command will receive the file and store it in your local
directory
How to upload the file again to AS400:
Again it is quite simple and instead of GET we need to use PUT command
to upload the file. But before that we need to create the SAVF in AS400 server
manually.
Let us try to upload this SAVF in another library DEVYUS2
Step 1: Create SAVF
CRTSAVF DEVYUS2/BKUP
Step 2: Upload using FTP

First we change our Current Directory of AS400 to “/QSYS.LIB/DEVYUS2.LIB”
Then we change our local directory of our desktop
Then changing the transfer mode to BIN (Binary)
Then using PUT command we transfer file back to AS400
So that’s it, hope you got the idea of how to send/receive SAVF from/to
your IBM I server.
Have Fun…!!! Happy Coding…!!!
Friday, July 21, 2017
Common Compilation Errors in RPGLE
Hello Friends,
Today we are going to see some of the common errors we come across while
compiling the RPGLE code. If you are beginner then this post could be useful if
you come across these error messages in your future.
It always give happiness when you compile you code with error code 0 on
first time J
Sample code with Error:
Order file:

Program:
Basically this program gets Ord_No & Cust_No as input and checks if the
order is available in ORDER file. If available then it prints the Order
quantity else it writes new record for the customer and order number with other
fields (Name & quantity) as default.

After compiling this below is the list of errors:

Let us go one by one and fix it.
RNF7030 à ORD_QTY is not defined
The intention of this line is to display order
quantity from file but variable used is Ord_Qty but file contains field as
ORDQTY. So compiler is not able to recognize Ord_Qty. Thus we need to remove
this underscore
Eval Msg = 'Order is available '+
'Qty : ' + Ord_Qty
RNF7055 à Factor 1 ORD_KEY is not valid
for the specified operation.
Ord_Key Chain
Order
Here we are trying to do chain operation on the file Order but the file
specification is not having record access as Key (‘K’)
FOrder IF
E Disk à
This should be changed as below
FOrder IF
E K Disk
RNF7016 à Display length 100 greater than
maximum allowed of 52;
This is because we are trying to display Msg variable using DSPLY
function. But the Max length that could be displayed is 52. But Msg variable is
having length 100. We need to change this to Max 52.
RNF7416 à The types of the right and left
hand side do not match in EVAL operation.
This is most common error you might have already seen it.
Eval OrdName
= Ord_No // we are trying to
eval char variable with numeric
RNF5196 à File in Factor 2 does not have
allowed file type for WRITE
When we need to add new records, the file specification should be defined
with File Addition = ‘A’
FOrder IF A E K Disk
Ok now let us quickly make the changes and compile again.

Now we eliminated all previous errors and ended with new 2 errors. Let us
fix these.

RNF7073 à KFLD at sequence number 18 is 4
long. Key field is 5 long.
This is because, our key Ord_Key is formed using Ord_No & Cust_No
variables with 4 and 10 length. But the actual files key is ORDNO (5 length)
and CUSNO (10 length).
So to fix this, either we can change length of Ord_No from 4 to 5, else
we can use Like keyword during
declaration to ask program to refer data type directly from PF.
RNF7421 à Operands are not compatible with
the type of operator.
This is because we are trying to concatenate string and OrdQty in Msg
variable. But OrdQty is numeric and thus we need to convert it to %Char before
concatenate
So the final code is here.

These are very basic errors and there are more to come when you use Copy
book and Procedures and introduce other ILE concepts.
I will try to cover few more in my future posts until then
Have fun..!!! Happy coding..!!!
Saturday, June 10, 2017
Security problems with RMTCMD
Hello Friends,
This is a
continuation of my earlier post on “how to execute CL command from Windows”.
If you have read that
post you should probably know how RMTCMD works with AS400. But still there are
chances of few security issues/violation using this method.
If I want to say in
one liner, “using RMTCMD a user can run CL command directly into AS400 even if
the user profile has “Limit Capabilities = *YES” LMTCPB(*YES)”
What is limit capabilities?
If a user profile is created
with limit capabilities as yes, then that profile will not be able to use most
of the CL command in the command line. When you try to execute a command you
will get error as
“Command CALL in
library *LIBL not allowed”

Using this we can
limit our user group from accessing unwanted/sensitive commands.
E.g.: If someone
issues a command DLTF on a PF this would probably delete the file from
production.
But when we use
RMTCMD option to execute this command from Windows
Can we control which command will be allowed for Limit
capable users?
Yes, we can. Every CL
command will be having attribute “Allow limited user”.
If it is “*No” then
we cannot use this command using limited access profile

If “*Yes” then we can
use this even if the profile has limited access

Note: But as a system administrator, you can change any CL command that can be run at command line to allow limited users to also run. This can be done using CHGCMD option.
E.g.: CHGCMD CMD(WRKJOB) ALWMLMTUSR(*YES)
But the rmtcmd.exe
completely ignores the Limit Capabilities attribute of the user profile and
therefore allows any user to run any command he or she is authorized to
run.
How to control this?
We have to use user
exit programs in exit points to control any unauthorized entries.
Exit Programs:
An exit point is
simply a point in an application at which the application can optionally call
an external program to perform customized processing. In other words, whenever
the RMTCMD is executed we can get the login details and validate it before it
gets processed. For this we need to add our exit program into IBM exit points
interface of RMTCMD.
Once you have
registered your exit program, whenever a user attempts to log on using RMTCMD,
the server finds your program that's registered for the exit point, then calls
your exit program, passing as parameters information about the user who's
logging on. Your exit program then processes that information and takes the
appropriate action, according to the security rules you implement in the exit
program. Upon return, your exit program passes back a flag to either ACCEPT or
REJECT the logon attempt.
Exit Points:
Each exit point has a
name and an Exit Point Interface. The Exit Point Interface is a list of input
and output parameters the IBM server program exchanges with your exit program.
The QIBM_QZRC_RMT exit
point occurs immediately after a user enters a user ID and, password to log on
to the AS400 server using RMTCMD command.
In this post I just
wanted to call out the security issues with respect to RMTCMD. I would try to
catch up with some practical example on how to use Exit points & Exit
programs later.
Until then… Have
Fun..!!! Happy Coding..!!!
Friday, June 9, 2017
Executing AS400 CL Command from Windows
Hello Friends,
If you have IBM System I Access for Windows then it would have given you
a DOS command called ‘RMTCMD’. Using this you can directly run the CL commands
from your Windows command prompt.
Syntax:
RMTCMD supports two formats
RMTCMD “CL COMMAND” [/Q] //AS400SERVER [/Z]
RMTCMD /I <filename> [/Q] //AS400SERVER [/Z]
RMTCMD à command name (CL commands can be given in double quotes)
AS400SERVER will be your server name
/Q à It specifies that command will
display the error and end the command (if any error encountered in CL command).
If we didn’t give then it will ask for options from you to continue or end
/Z à Specifies to display only
required messages on your workstation
E.g.: I want to clear a file DEVYUS1/TEMP

It will prompt you for user name & password. And the commands will execute directly on your AS400.
E.g.: Output
We can see using /Z option the extra details (version and copyright info) were not displayed.

What if we have multiple commands to execute?
We can have it in a file
and use our 2nd command.


What if we want to execute a DOS command from AS400?
STRPCO & STRPCCMD
You have to start PC Organizer (STRPCO) first then using STRPCCMD we can execute any DOS
command.

Hope you might have learnt something useful. I shall come back with
another interesting topic later. Until then… Have Fun..!!! Happy Coding…!!!
Sunday, May 28, 2017
Pointers in AS400 (IBM i)
Hello Friends,
Pointers are one of the key features in AS400 RPG programming. If you
are a beginner and just started to write some RPG code then it is good to
understand the concept of pointers.
What is pointer?
Pointers are used to hold the memory address of a variable (just like
how it used in C). This will become handy when we need to process larger size
data.
Let us take a simple example:
Pointer can be declared using asterisk (*) symbol. We can assign this
pointer to a variable using Based
keyword. In the below example P_Data
is based on pointer Ptr. This means,
Ptr will hold any address and P_Data will display the content of that address.

We can see from above that, address of Var1 is assigned to Ptr. Now Var1
& P_Data points to same address. So if we change Var1 data, it will be
reflected in P_Data.
Similarly, if we change P_Data value then it will be reflected in Var1
value.
Segmentation with pointers:
Using pointers we can split the large data into small chunks and access
it.
Let us take below example:

Here Var1 is of length 100 but we are accessing the data by splitting
into small chunks (of 10 length) using P_Data variable.
We initially assign address of Var1 into Ptr and then we increment the
Ptr value by adding size of P_Data.
Output:

Do you know this trick?
Hopefully you might have used RPG calling another RPG using parameter. We
would have noticed same variable used for both input & output. (i.e. if PGMA
calls PGMB has parameter ABC, then I change the value of ABC in PGMB then it
will reflect in PGMA automatically).
This is because; the two-way parameter is achieved using "shared
memory".
When one program calls another, the only thing that’s passed between
them is an address in the computer’s memory where the parameter starts. Nothing
else is passed.
Look at the below example for better understanding.
TESTPGM à calls GETNAME it passes Name as parameter. But length of Name is
10 in TESTPGM. But we receive this value using *Entry Plist under FullName
variable (of length 20) in GETNAME program. We assigned value “Mohammed Yusuf”
and program returned the value to calling program (TESTPGM).
Now, if we display variable Name we get “Mohammed Y” alone. The remaining
value gets assigned to Address variable (since both are under DS)

Output:
Name = “Mohammed Y”
Address = “usuf”
What happened here? When program “GETNAME” called, system passed the
address of Name variable. And GETNAME program assigned the value “Mohammed
Yusuf” in that address.
Now when TESTPGM receives it, Name variable can hold only 10 length so
remaining text is present in Address variable. (because Name & Address are
in single Data Structure so it forms continues memory allocation)
How to overcome this?
Instead of *Entry Plist, start using PI (Procedure Interface)
- It is similar to *Entry Plist (but better than that)
- It requires matching prototype to work
- Replacement of *Entry Plist in Free format

The program GENAME is changed to GETNAMEPR and uses PI to receive the
parameter. The calling program TEST is changed with Prototype definition of
GETNAMEPR.
With this in hand, if we try to call GETNAMEPR with variable Name it will throw error since length of
Name is not matching with parameter length
of Prototype.
Parameters & Prototype has many useful things in ILE programming. I
will try to cover those in my upcoming posts.
Until then, Have fun…!!! Happy coding…!!!
Monday, May 8, 2017
XML parsing in AS400 (IBM-i) using XML-INTO
Hello Friends,
If you are new in working with XML in AS400 or just starting to do some
XML parsing, this article will be useful to you.
XML-INTO is the op-code used to parse the XML document and retrieve the
values directly into the variables in RPGLE.
Previously I saw many examples using DOM parser but it is complex for
any beginners. But IBM introduced XML-INTO op-code and made the XML parsing
much easier. Let us directly jump into syntax and examples.
Syntax:
xml-into <VariableName> %xml(<filename> : options)
There are couple of options which are considered while parsing the xml. We
will see one by one.
Mostly the <variablename> will be a data structure which matches
with the xml structure.
Simple XML:
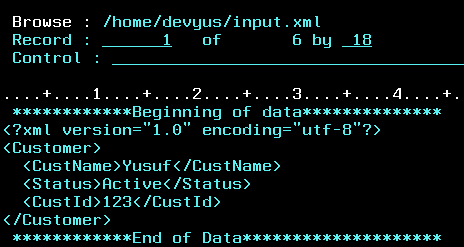
RPGLE:

Output:

Options in xml-into:
Case=any
In general XML tag names should match with RPG variables with case sensitive.
But using case=any option we can eliminate it.
Doc=file
This tells the op-code that xml data source is coming from a file
document. In this case, the first parameter of %XML function will be file name.
Allowmissing=yes
Sometimes if we are having missing fields in XML document
Allowextra=yes
Sometimes if we get extra tag in the XML (not defined in DS)
In other words, if u expect all the DS fields are mandatory in your XML
you can give allowmissing=no and handle the exception and allowextra=no will
not accept any extra tag to come in your xml.
In most cases, we use both as ‘yes’ and handle the exception in program.
Path=”string”
Using path option you can directly read any particular tag value. We will
see it deeper in coming examples.
A complex XML:
Let us look at below example which has nested tags, attribute value and also
repeating a particular tag number of times.

Here we need to know how to define a nested data structure and how to
find number of times a tag being repeated. Fortunately, xml-into offers an easy
way to do that.
And trust me we can just parse all the values with single statement J
How to form nested Data Structure:

If you look closely, we have split the group of tags into separate DS and
nested into main Customer DS using LikeDS keyword. The reason for CtInfo_T
& Item_T is declared as Template but Order_T & OrdDet_T are declared as
Qualified because, if we are going to have any nested DS then the parent DS
should be declared as Qualified.
Take a note on DepartmentNumber. This exceeds normal variable length of
15 char while defining in RPGLE. So if we have variable length more than 15 char
then we have to write the full name followed by three dots. Thus system will
look for its declaration in next line. (in our case 2S 0)
Count_Item:
Do notice this variable Count_Item is an extra field apart from XML
fields. When we need to parse multiple occurrence tags (in our case
<item> tag) then we have to define a variable next to repeated tag so
that system will automatically give us the number of repetition in this variable.
RPGLE code:
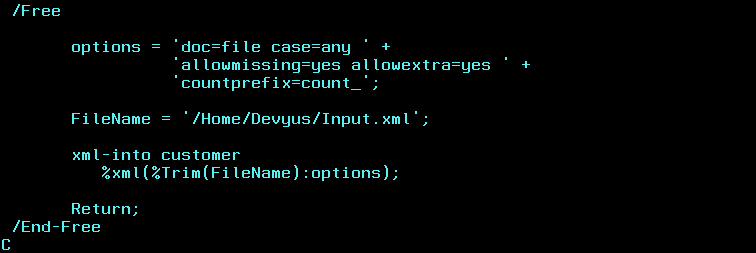
Please note on the countprefix option. We are saying the system to
return the count of repetition under the variable has prefix “count_”
i.e. for item tag the count variable should be “count_item”
if we change “countprefix=cnt_” then in our DS, the variable should be “cnt_item”
here we go, we got all the values, and also the count_item has number of
repetition as “3”.
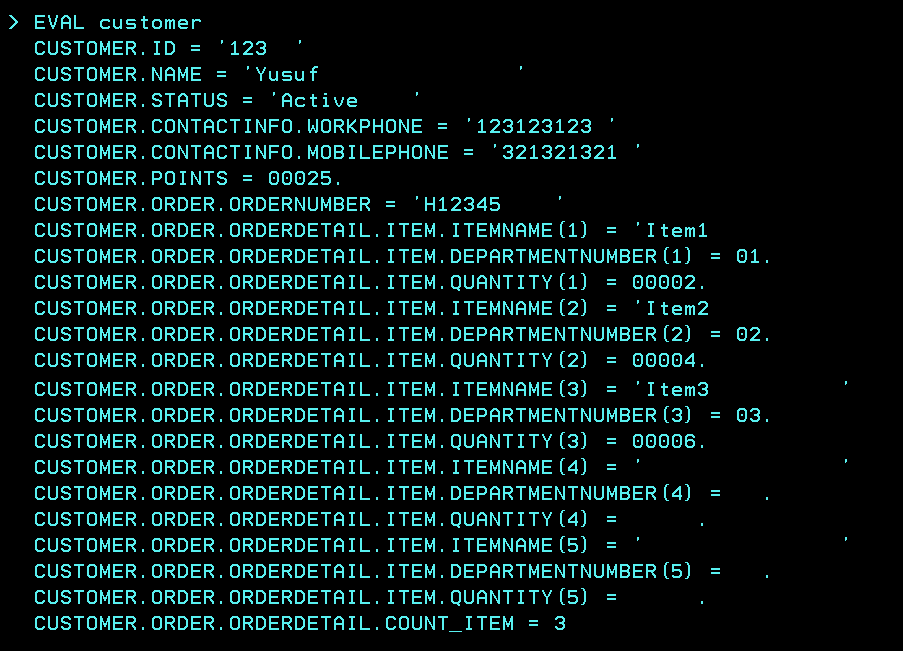
With this in hand, we can very well do our program logic and proceed further.
One last example using path option:
Using path we can directly read any segment of xml. For example, I want
to retrieve OrderNumber alone from the XML. Then,

Do note that if we are fetching value of a single tag directly then
variable name to receive the value may not need to be the same xml tag name. (Here
OrdNum is used).
Hope this post gives you enough idea to get start with xml-into method
of parsing. It is really very useful as you can see it requires very minimal amount
of coding. I will come with another topic soon. Until then…
Have fun..!!! Happy coding…!!!
Subscribe to:
Posts (Atom)